First backup your image before starts anything
| Warning:
A Backup is made before doing anything else and your Linux OS is not running, therefore it is safe for the Linux Virtual HD that you work on. It is faster since you use you Host Operating System (Windows XP) to perform the Linux commands and copy files, this is faster than under coLinux. |
Methods to expanding Root filesystems
- This way seems more complicated, but it is the faster and safer way. A backup is inclusive by this steps. You would need the same free disk space in comparison with create a backup, increase filesize and resize the new image. Extremely you need less free disk space because you can create the new image as sparse file.
- fs2resize - Resizing an existing image
- This method is extremely dangerous and you can damage an existing image. It seems faster in the first view. But, it is strongly recommended to made a backup, and than it is not faster as the other way. If you don't create a backup, then it is faster and needs less free disk space as the method above. In some case you have limits on filesystem and never you will finish your steps.
- This makes the root filesystem not bigger, but it adds some more space at any point in the filesystem and give free some spaces for root filesystem. For example if you would move the
/home,/usror/optinto additional image file. This is a good idea if you are creating your system. Or later, if you feels, that your/homedirectory needs more space and the system can use the typically size of 2 or 4GB. Splitting/homeand the rest is also good to change or upgrade the system later.
The differences between the descriptions are, that some needs complete Cygwin shell for all steps, others use only a subset of commands (f.e. fs2resize.exe) and others only use Windows tools and does the rest in Linux.
Copy all files into new created image
Copy whole filesystem into new image
A backup of your current running system will be the old file later. So, you not need an extra backup here.
For this steps
- From windows, create a blank file of the new size. For 5GB=5*1024*1024*1024 bytes, open a command prompt and run fsutil file createnew C:\??? 5368709120. (If you do not have fsutil, see HowtoCreateSwapFile.)
- Edit the colinux configuration file to add the blank file as a new device, for example cobd1=New.img, and restart colinux.
- If you can, switch into single user runlevel. init s (or shutdown now)
- Format filesystem. mkfs.ext3 /dev/cobd1
- Mount it. mkdir /tmp/mnt; mount /dev/cobd1 /tmp/mnt
(Do not mount it on mnt: the cp -x would not work there) - Copy contents to new device. cp -ax / /tmp/mnt
- Copy device nodes (only if udev system, i.e. kernel 2.6+). if [ -d /dev/.udev ]; then cp -a /dev/* /tmp/mnt/dev/; fi
- Check that the file /tmp/mnt/etc/fstab does not have 'labels'. Use only /dev/cobd... there.
- Check the used sizes with df
- Let's sync data, a saver step for some systems. sync
- Unmount new device. umount /dev/cobd1
- Shuting down coLinux. shutdown -h now
- From windows, edit your config file again. Change the entry of the old device to use the newly created file. Then remove the entry created above.
- Restart coLinux.
Keep the old file until you are sure the new one works!
The simplest way to enlarge the root partition:
There is a tremendous amount of information in this entry, most of which makes something that can be simple far too complex. But here's the simplest way to do it, without doing any math or hijinx with dd, thanks to Gniarf's preformatted filesystems. Of course, if you want a filesystem of a size different than those provided, you'll need to read about the more complex ways below.
1) Download the larger, preformatted filesystem of your choice from http://gniarf.nerim.net/colinux/fs (Remember that 4095Mb is the limit if you are using FAT32 (and not NTFS) on the windows partition where the filesystem will be stored.)
2) Unpack the new filesystem using the bunzip2 program of your choice, such as 7zip [1]
3) Edit your colinux config file. Add a line to load that filesystem on an unused cobd device, e.g.
cobd3="c:\Program Files\colinux\fs_4095Mb"
4) Boot into colinux. Make a mountpoint and mount the new filesystem from the cobd device. E.g.
      mkdir /mnt/test
      mount /dev/cobd3 /mnt/test (that's /dev/cobd/3 on GenToo)
5) Copy the old filesystem onto the new filesystem using cp -ax. Once it finishes, unmount and exit colinux. E.g.
      cp -ax / /mnt/test
      umount /mnt/test
      shutdown -h now
NB: Under Gentoo Linux you may need to copy the contents of /dev to the new filesystem. Missing this step will cause Gentoo to issue a warning and instructions to fix it on reboot. So copy the contents of /dev before issuing the umount command E.g. (GW: I had to do the same under Ubuntu 9.04)
cp -a /dev/* /mnt/test/dev/
6) Change your colinux config file to use the new filesystem as root and delete the line referring to the new filesystem you added in a previous step. (You might want to zip up the old filesystem for backup purposes.) E.g.
cobd0="c:\Program Files\colinux\fs_4095Mb"
7) Reboot colinx. You should have a larger filesystem (use "df -h" to check). You're done.
Resize an existing image
TopoResize - resize root file systems via GUI
TopoResize will create new images or enlarge/shrink existing images using the ext2 or ext3 file system. It's still pretty new (and may have bugs), so use at your own risk. (There is in fact a bug where it won't work when your image filename has a space in it.) However, if you're squeezed for disk space, this program can be a real lifesaver! =) It uses a GUI so it is "newbie friendly" in terms of ease of use. The options are pretty straightforward.
This tool will increase the file size, resize the file system and checks the file system integrity. The programs behind this tool are Linux file systems tools, they are ported to Cygwin. TopoResize is also a good source for getting cygwin ports of e2fsprogs. It is just a tcl/tk front end for them so advanced users can use them at the command line.
Before you starts this tool, be sure, that you are not running other Cygwin shells, because you can run only one Cygwin.dll at same time.
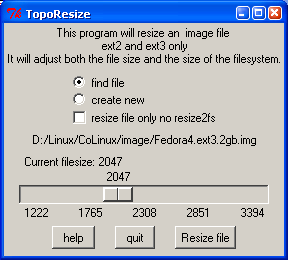
- Be sure, that coLinux is not running now, and that your root file is an ext2 or ext3 file system.
- A good idea is to make a Backup of the current image file now. Copy the file somewhere into a separate directory.
- Download the tool toporesize-0.7.1.zip from Chris Semler
- Unpack the zip
- Run the batch file toporesize.bat
- Click to find file and select your image file, for example Debian-3.0r0.ext3.1gb
- The current size will be show as slider
- Use the filesize slider and move it to your needed size
- Click the button resize file
TopoResize can now be found at Chris Semler that is the creator's webspace, or from one of the mirrors:
- http://csemler.com/toporesize-0.7.1.zip
- http://www.henrynestler.com/colinux/tools/toporesize-0.7.1.zip
The fastest way to enlarge the root partition (live)
Using dd
WARNING: Data loss possible! This method also has a limit on how much bigger the resulting image can be, see here.
Download dd for Windows: http://www.chrysocome.net/dd
Calculate size of root image in 16K blocks: Assuming root image size is 1 gigabyte / 16384 = 65472 blocks
Enlarge root image: (seek= argument specifies old image size in blocks, count= specifies how much to add in blocks)
dd bs=16384 if=/dev/zero of=root.img seek=65472 count=100000
Resize partition online using ext2resize
On Ubuntu you'll need to download the deb file first, as it's no longer in the repository: (ext2online installs in /usr/sbin, so you'll only see this as root)
wget http://ubuntuarchive.hnsdc.com/ubuntu/pool/universe/e/ext2resize/ext2resize_1.1.19-9_i386.deb
dpkg -i ext2resize_1.1.19-9_i386.deb
ext2online /dev/cobd0
On Debian, kernel 2.6.17, coLinux 0.8.0 snapshot:
    apt-get install ext2resize
    ext2online /dev/cobd0
Done!
Resize partition online using resize2fs
Alternatively, you may use resize2fs, which is part of e2fsprogs. This may be preferable on a Ubuntu system as it is still in the repository.
apt-get install e2fsprogs
resize2fs /dev/cobd0
Done.
Toporesize - Command line tool
As an alternate to dd you could use toporesize (from within windows) (see http://www.andlinux.org/forum/viewtopic.php?t=131).
Resize to a 10G image:
C:\Program Files\andLinux\ImageResizeTool\toporesize-0.7.1>tfile ..\..\Drives\base.vdi 10000
Raw copy and resize
Currently this method copies the data two times: once when you create a backup and once when you create the new image. If there is an easy way to change the length of a file, we could use the current root image as backup (because it will not change, at least not more than it does in normal operation) and therefore only copy the data once.
This method is very easy and very reliable, and does not require any cygwin tools.
1) Shut down coLinux if it's running, as you normally would.
2) Make a copy of your current image. To make it easy to distinguish the images, you could use the following filenames:
cur_img.2gb (for your current image of 2 GB)
old_img.2gb (for the copy of your current image)
new_img.4gb (for the 4 GB image that we will create in the next step)
3) Open a command prompt in Windows XP and change to the directory in which your images are kept. Use the following command to allocate a new blank file.
- 1 GB = 1073741824
- 2 GB = 2147483648
- 4 GB = 4294967296
- 8 GB = 8589934592
- x GB = x*1024^3
>fsutil file createnew new_img.4gb 4294967296
You'll will get a message similar to this, if all goes well:
The file C:\Program Files\coLinux\new_img.4gb has been created
From this point, lines that do not start with a prompt symbol (> or #) are replies from the computer.
4) Add the old and new images as block devices in your configfile.
cobd0="c:\Program Files\coLinux\cur_img.2gb"
cobd3="c:\Program Files\coLinux\old_img.2gb"
cobd4="c:\Program Files\coLinux\new_img.4gb"
Note that it is possible to use other indices than 3 and 4, however you will have to make sure that they are supported. Indices 5+ may fail to load on many Debian and Ubuntu systems, and changes are you will get no obvious warning. If you do decide to change indices, you will have to make sure that you change all the indices in the next steps to stay consistent.
5) Start coLinux.
6) Check if the the old filesystem is clean:
# e2fsck /dev/cobd3
e2fsck 1.40-WIP (14-Nov-2006)
/dev/cobd3: clean, 70328/262144 files, 519377/524288 blocks
7) Copy the data from the old image to the new image:
# dd if=/dev/cobd3 of=/dev/cobd4
4194304+0 records in
4194304+0 records out
2147483648 bytes (2.1 GB) copied, 484.017 seconds, 4.4 MB/s
8) Check the new filesystem. -f will force checking even if filesystem is marked clean.
# e2fsck -f /dev/cobd4
e2fsck 1.40-WIP (14-Nov-2006)
Pass 1: Checking inodes, blocks, and sizes
Pass 2: Checking directory structure
Pass 3: Checking directory connectivity
Pass 4: Checking reference counts
Pass 5: Checking group summary information
/dev/cobd4: 70328/262144 files (3.9% non-contiguous), 519377/524288 blocks
9) Resize the new filesystem to make use of all the space available:
# resize2fs -p /dev/cobd4
resize2fs 1.40-WIP (14-Nov-2006)
Resizing the filesystem on /dev/cobd4 to 1048576 (4k) blocks.
Begin pass 1 (max = 16)
Extending the inode table     XXXXXXXXXXXXXXXXXXXXXXXXXXXXXXXXXXXXXXXX
The filesystem on /dev/cobd4 is now 1048576 blocks long.
10) Check the new filesystem again:
# e2fsck /dev/cobd4
e2fsck 1.40-WIP (14-Nov-2006)
/dev/cobd4: clean, 70328/524288 files, 527605/1048576 blocks
11) Change your config file to boot from the new image.
cobd0="c:\Program Files\coLinux\new_img.4gb"
12) Boot coLinux to test if it still works. You might want to see the glorious amounts of free space that is now available:
# df
Filesystem           1K-blocks      Used Available Use% Mounted on
/dev/cobd0             4128448   2044612   1958008  52% /
Other mounted filesystems will appear as well.
13) If everything went smoothly, you can optionally delete your original image and the old image. You might also want to keep one around for archiving purposes. It doesn't much matter which one, but it is harder to mess up the original image, because you are not doing any black magic with it and you're just using it as you normally would.
Duplicate raw data and resize
I started with a 1GB partition and tried to resize it with topresize. Despite making the size around 10GB, the resulting file only had another 1GB available and using topresize to change the file a second time resulted in a kernel panic when it tried to mount the resulting file store.
I used toprestore to create an empty 32GB filestore without any problems and I mounted that at a second mount point, but I always wanted my file store in a single file to make it simpler to back up.
Requirements
- NTFS file system.
- fsutil.exe
- Enough space on disk.
Back up your file store file right now!
In the last 36 years I have always told users "If you reach the point where you wouldn't like to do it all again, you should already have backed it up." Do they listen? Guess.
The simplest option is to create a folder and copy your original image file into it and then create a config file that points to the file in this location.
Method
In the following:
- {old} = the name of the old image
- {new} = the name for the new image
- {size} = the number of bytes to add to the image
The size is in bytes (thanks MS) but you can always copy it out of Windoze calculator. A power of two is a very good plan, so multiply your required size by 1,024 * 1,024 for megs and by another 1,024 for gigs.
Open a command window, navigate to the folder that you want to use and then type:
fsutil file createnew bigfile {size}
This creates a sparse file of the required size. Never copy this file or it will magically shrink from umpteen gigs to a couple of K! Instead, type:
fsutil file setvaliddata bigfile {size}
This will make the file less sparse ready for the grand copy, type:
copy {old} /b + bigfile /b {new}
Note the /b option specifying binary format for both input files - omitting this will make the copy very fast and the output file very small.
{new} should now contain a file store of the original size with {size} bytes free on the pseudo partition.
Start up CoLinux using the alternative config file that specifies {new} and log in as root.
Assuming {new} is mapped in as /dev/cobd0, type:
resize2fs /dev/cobd0
and this will expand the file store to the maximum extent available in {new}.
All that remains is to delete bigfile and move the new file over to your preferred folder.
Enjoy :D
Several more complex ways to make a bigger root partition:
First, look at the very bottom of this page. There is a fairly easy way described how to resize root. You only need a very small program (mksparse) and no cygwin. Worked very well for me. Philipp
by Joe Wells (http://www.macs.hw.ac.uk/%7Ejbw/) on 2004-08-07
Here is a precise step-by-step guide with careful error checking to enlarging your coLinux root partition. These instructions were inspired by the earlier version which is still appended below. These instructions make a perfect copy of your current root partition, except larger.
These instructions improve on the earlier ones in that (1) they are more detailed, (2) they contain careful error checking steps that insure that nothing has gone wrong, (3) the invocation of dd is rearranged so that calculating the correct numbers to use is easier, and (4) they do not need you to install the ext2 file system tools under Cygwin (important because the standard Cygwin installer does not know where to find them).
Background and Requirements
This procedure is for ext3 file systems. It should also work for ext2 file systems, but I have not tried this. Only minor adaptations should be needed for reiserfs or XFS file systems. The earlier instructions still appended below should have the necessary adaptations.
This procedure assumes your current coLinux root partition is 2 gigabytes (2 * 1024 * 1024 * 1024 = 2147483648 bytes) in size and that you want to expand it to 4 gigabytes (4 * 1024 * 1024 * 1024 = 4294967296 bytes). If your current and desired sizes are different, it should be easy for you to adapt the instructions. Your host version of Windows must support files of the desired size.
This procedure needs disk space for both your current coLinux root partition and also the new larger version of it, because you will be using them simultaneously. Your current coLinux root partition is
- not* enlarged, but rather a new partition is created that is a larger
version of your current partition.
This procedure assumes you have the Cygwin environment installed on your Windows host machine, including at least these programs: bash, dd, cmp, ls, cp. If you don't have Cygwin installed, it should be easy to substitute equivalent Windows actions for everything but the instructions using dd. If you can't get dd, see the instructions for using dd for an understanding of how you might substitute some equivalent action.
This procedure assumes that your current coLinux root partition has at least these programs installed on it: resize2fs, e2fsck, shutdown, mkdir, bc, mount, umount, echo (or your shell has echo built in).
In the instructions below, the old root partition file is named gentoo-i586-ext3-2g-deluxe, the old coLinux configuration file is named default.colinux.conf, the new enlarged root partition file is named gentoo-i686-ext3-4g, and the new coLinux configuration file is named gentoo-i686-ext3-4g.colinux.conf. You *must* replace these names by the names you are actually using.
Each step is marked with "Linux", "Cygwin", or "Windows" depending on whether you need to do the step in your running coLinux, on Windows using the Cygwin tools, or just on Windows with any text editor.
The Steps
1. Linux: Shut coLinux down to insure sane state of root filesystem:
shutdown -h now
2. Cygwin: Copy old root partition, adding 2g of empty blocks at end:
      dd if=/dev/zero bs=1k count=2M |
      cat gentoo-i586-ext3-2g-deluxe - > gentoo-i686-ext3-4g
(replace the 2 in 2M by the number of gigabytes you are adding. 2M does NOT mean "2 Megabytes" but 2 Million times a block of 1 kByte (bs=1k), so you get 2 Million * 1 kByte = 2 Gigabyte)
Oh, and please remember that copying from and to the same disk 'does' take some time.
It _might_ take an hour or more for a 10GB size file on a fast computer !
3. Cygwin: Verify new partition file has correct contents:
cmp gentoo-i586-ext3-2g-deluxe gentoo-i686-ext3-4g
(should report binary files identical up to end of 1st file:
"cmp: EOF on gentoo-i586-ext3-2g-deluxe")
(seems to take at least as long as the initial copying)
4. Cygwin: Verify new partition file has correct size:
      ls -l gentoo-i686-ext3-4g
      echo '4 * 1024 * 1024 * 1024' | bc
(the number output from bc should be the size of gentoo-i686-ext3-4g in bytes)
5. Cygwin: Copy old coLinux configuration file:
cp default.colinux.conf gentoo-i686-ext3-4g.colinux.conf
6. Windows: Edit the new configuration file to add the new partition:
cobd2="c:\Program Files\coLinux\gentoo-i686-ext3-4g"
(the number 2 should actually be the next unused number in your configuration file)
7. Cygwin: Boot coLinux using the new configuration file which still uses the old root partition:
colinux-daemon.exe @gentoo-i686-ext3-4g.colinux.conf
8. Linux: Check that the file system we are expanding is in fact in good shape:
nice --adjustment=+19 e2fsck -fv /dev/cobd2
(WARNING: The number 2 in /dev/cobd2 must match the number 2 in
index="2" above. Check also with the mount program that /dev/cobd2 is
not already mounted. If you make a mistake in choosing the
correct partition number here, you will probably destroy your
existing partitions!)
(-f forces checking even if not marked dirty, -v means verbose)
(the nice isn't really needed for a fast machine and a small filesystem)
9. Linux: Use resize2fs in Linux to resize copied file system on new partition:
resize2fs -p /dev/cobd2
(-p for progress indication, not really needed in this case)
10. Linux: Check that the new number of blocks reported by resize2fs (1048576 blocks) multiplied by the block size (1024 * 4 = 4096 bytes) is correct:
echo '1048576 * 4 * 1024' | bc
11. Linux: Check that the expanded file system is still in good shape:
nice --adjustment=+19 e2fsck -fv /dev/cobd2
(-f forces checking even if not marked dirty, -v means verbose)
(the nice isn't really needed for a fast machine and a small filesystem)
12. Linux: Mount the resized file system and play with it:
      mkdir /tmp/newfs
      mount -t ext3 /dev/cobd2 /tmp/newfs
... various commands to test things are okay ...
umount /tmp/newfs
13. Linux: Shut coLinux down to allow coLinux to use the new larger file system as root:
shutdown -h now
14. Windows: Edit the new configuration file to replace old root partition by new enlarged partition:
cobd0="c:\Program Files\coLinux\gentoo-i686-ext3-4g"
(you must comment out or remove the mention of the old root partition and change the mention of the new partition to read as just above)
15. Cygwin: Boot coLinux with the new configuration and the new root partition:
colinux-daemon.exe @gentoo-i686-ext3-4g.colinux.conf
16. Linux: Test that it works!
The earlier (before 2004-08-07) instructions follow this point.
the SAFE way is the same way I create multiple gentoo images:
Requirements: 3 Images
- source image
- target image
- small, bootable image
A good chunk of spare disk space.
take and boot image 3 and when you get to a login, mount image 1 as /mnt/oldroot. mount image2 as /mnt/newroot (creating the filesystem if necessary).
Now, you just do ‘cp -ax /mnt/oldroot/* /mnt/newroot/’ and it'll copy all the files.
This is not, however, GROWING a filesystem, it's just making the file biger.
Actually growing a file system
This is VERY dangerous ground where ext3 is concerned.
For reiserfs and XFS it's not that big a deal.
in cygwin, go to the directory that the image is in.
like
# cd /colinux
now find the size of the image:
# ls -al *img
* rw-r--r-- 1 root root 4294967296 Feb 27 03:32 test-img
now what we want to do is dd onto the end of that file, I'm going to assume that the block size is 16K, although most systems will perform better at 32K.
This means our file is:
- filesize(bytes)/1024(bytes/K) K
or
- 4192350KB
but we need blocks, not K, so we divide by blocksize now(16K)
- 4192350/16=262021
this means our image is 262021 16K blocks long... now that we know that, we use dd.
Let me summarize what info we have so far:
- filename=test-img
- blocksize=16K
- filesize =262021 BLOCKS
now, we need to figure out how much larger we want it (keep in mind, some file systems don't like files larger than 2gb, which may require a Raid solution) lets assume we want to add 1GB. we need to find out how many 16K blocks that is. 1GB*(1024MB/GB)*(1024KB/MB)/(16KB/BLOCK} or 65536 this means we want the new image to be 65536 blocks larger than the original.
| Warning: BACKUP YOUR ORIGINAL FILE NOW! |
here's where we start the grow. I'll explain it as we go...
We know so far:
- our file is './test-img'
- it is 262021 blocks long
- but we want to make it 65536 blocks longer
- where all those blocks are 16K
- this translates to the following dd command:
dd if=/dev/zero of=./test-img bs=16K seek=262021 count=65536'
- if=/dev/zero reads from /dev/zero
- of=./test-img writes to ./test-img
- bs=16K read/write 16K blocks
- seek=262021 skip the first 26021 blocks
- count=65536 write 65,536 blocks.
- this should execute 'relatively' fast. 2-3 minutes.
- another option is to do seek=262021+65536 count=1
- this is considered 'safe' but I don't have experience with it.
- We've now grown the IMAGE… we still need to grow the actual filesystem.
Growing the filesystem
I'll assume you know what filesystem the file is (probably ext3). it should be stated in the filename. To resize ext3 you need to install the filesystem tools for that filesystem in cygwin. For XFS, it's xfs_growfs, which needs to be run from within Colinux while the filesystem is mounted rw. For ext2, it's resize2fs which is in the e2fsprogs package, available from http://e2fsprogs.sourceforge.net/ (does also build under Cygwin) for sanity's sake (the method I KNOW that works)
resize2fs test-img
and you should be done. If you resize the image under cygwin install the e2fsprogs package. The tools e2fsck and resize2fs.exe are located under /usr/sbin. On cygwin:
  c:\colinux> /usr/sbin/e2fsck -f test-img
  c:\colinux> /usr/sbin/resize2fs.exe test-img <new-size>
  c:\colinux> /usr/sbin/e2fsck -f test-img
(For the image size <new-size>, the units K, M, and G are valid. E.g 2400M, 3.4G)
<Gniarf> well there is one small issue : under FAT32, you are not limited to 4 Gb but to 4 Gb minus 2 bytes (check it if you dont believe me). for some reasons I believe it is safer to use 4095 Mb than 4096 here, there may be some nasty issues when co Linux tries to write down there, resulting in possible corruption of the coLinux image.
<GarrettSerack> Using MkSparse http://www.acc.umu.se/~bosse/mksparse.zip to make larger growable root filesystem: I used this to create a 10 gig sparse file, and moved the root filesystem over to it. On Windows:
c:\colinux> mksparse 10gigfs 10G
Alternatively you could also use fsutil as described in HowtoCreateSwapFile which is included in Windows XP and above:
c:\colinux> fsutil file createnew 10gigfs 10 737 418 240
Add it to the colinux config:
cobd3="c:\colinux\10gigfs"
Boot into colinux Login in as root, and perform the following:
   # dd if=/dev/cobd0 of=/dev/cobd3 bs=1k count=2M
   # e2fsck -fv /dev/cobd3
   # resize2fs -p /dev/cobd3
   # e2fsck -fv /dev/cobd3
(remark from Dennis De Winter: replace /dev/cobd0 and /dev/cobd3 by /dev/cobd/0 and /dev/cobd/3 when using Gentoo dedicated to kernel 2.6 !!!!) Shut coLinux down to allow coLinux to use the new larger file system as root:
shutdown -h now
Remove the old root, and use the one you just made:
cobd3="c:\colinux\10gigfs"
Change device 0 to:
cobd0="c:\colinux\10gigfs"
Adding new mount point
Create more drivespace by making a new drive and mount it "/"
'Note: despite what it says below, this method is not faster, nor is there any reason to assume it is safer. 82.139.85.20 07:33, 9 December 2007 (UTC)
The (safest) fastest possible way to expand your coLinux drive's space is to create a new virtual drive file in your Window's c:\colinux directory and use coLinux's Linux commands (maybe Cygwin or QEmu too) to re-initialize it as an ext3 type drive.
You can start the "shutdown -h now" procedure in coLinux and ALT-TAB to Windows while what comes next is being done.
First get a file on your Windows system (could be ANY file, but it would be more sensible if it had a size that was 1024^x - EG: 100M or 2 gigabytes, not 123456789 bytes), I suggest you use your swap file but you will need to wait for coLinux to finish it's shutdown before you use it.
If you want to make whatever file you use bigger then click your [START] button, click on "Run" and type "cmd" (and hit return) - this shells you to DOS.
Type this:
cd c:\colinux
copy /b swap_2048Mb+swap_2048Mb drive_1.ext3.4GB
exit
That will take two 2GB swap files and combine them to make one 4GB file. It will do so as quickly as your operating system can do it. That might take 20 minutes for some people. Add additional "+swap_2048"'s to increase the size further.
If you just want to use your swap file "as-is" (the size that it is) then copy it to a different directory (slow), rename it, and copy it back (instant) using Explorer and a few mouse clicks.
Now you should have a file called c:\colinux\drive_1.ext3.4GB .
Edit your configuration file (might be called c:\colinux\coLinux.conf) and add this after all your other drives (root / swap / cdrom etc.) :
# A second (virtual) HD - 4 GB in size
cobd3="c:\colinux\drive_1.ext3.4GB"
Save the file and start coLinux the usual way.
Type the following to initialize the file to a Linux ext3 type, double check that it is correctly sized, and check the file system for problems:
mke2fs -b 1024 -j -v /dev/cobd3
e2fsck -f /dev/cobd3
resize2fs -p /dev/cobd3
e2fsck -f /dev/cobd3
Remember to use the correct number above where it says "/dev/cobd3". You might need 2 or 4 - but NEVER 0. Don't use "0". That should only take 5 minutes for a 10 GB file.
If everything is OK then mount it. If something went wrong re-check your typing. At worst the file on your computer will not be any good, but what use was the file made from a couple of spare files copied together?
You might do something wrong and make the file "c:\colinux\drive_1.ext3.4GB") unusable as a coLinux directory when you type (for example) "ls -l /tmp/newfs" (or wherever it is mounted).
You can NOT wreck your Windows drives (in coLinux) with the above commands (or something close, but wrong). You can NOT wreck your coLinux drives (in coLinux) with the above commands (or something close, but wrong). Thus, this method is quite safe.
To use the new drive immediately:
mkdir /tmp/newfs
mount -t ext3 /dev/cobd3 /tmp/newfs
Type "df". You should see something like this:
Filesystem           1K-blocks      Used Available Use% Mounted on
/dev/cobd0            14449712  12817036   1339076  91% /
...
/dev/cobd3            10318744      8472   9890842   1% /tmp/newfs
You can delete the "lost+found" directory if it exists, you don't want two.
rm -r /tmp/newfs/lost+found
If you want to move some files from the origonal drive to the new drive type:
cp -r --preserve=all /somedirectory/* /tmp/newfs/
Now you can erase "somedirectory" after checking that it copied OK. When you remove "somedirectory" you can make it re-appear by mounting the copied directory "/dev/cobd3" to "somedirectory" and then your coLinux drive will look exactly like it did before you started (and nothing will break). You will have extra space on your drive that you did not have before, that will be the only visible change.
Your coLinux directory (on Windows) (c:\colinux) will look slightly different since there will be a new file and the coLinux configuration file will have been edited. Other than that Windows will look the same as it did. If this is not the case you need to re-read these instructions.
For Debian (and some other systems) you can auto-mount the file by creating an fstab entry. Type "nano /etc/fstab" and add a line like this:
/dev/cobd3 /somedirectory ext2 suid,dev,exec 0 2
When you re-boot and type "ls -l /" you should see a directory called "somedirectory" in your root directory. That directory is actually the file on your Windows system called "c:\colinux\drive_1.ext3.4GB". You can copy files from other directories (like /root/downloads) to the new /somedirectory/dowanlods directory and it will look like you made your root dirve bigger. The two seperate Windows files will operate as one big HD on your coLinux system. You can do this many times. Each time you do it you are creating a new drive so there is a disk limit to consider.
After you reboot you can test if it is OK and delete "/tmp/newfs".
If you mess up (a little) in coLinux you will only wreck your "/dev/cobd3" file. Make sure you use "/dev/cobd?" (whatever comes AFTER the other, existing cobdX files) and DON'T use "/dev/cobd0" in any of the above instructions (no matter what you think you are try to do). This guarantees that your system WILL boot when you re-start and you can't loose everything (as you might with some of the following methods - they warn about this in some of those methods below).
The resulting Linux file system will appear as it did before you started so all your scripts will still work and you won't need to edit any configuration files.